


How to Germinate Cannabis Seeds
(99,9% Success Rate)
By Jennifer | April 22nd, 2024

This is the complete guide on how to germinate weed seeds.
In today’s guide you’ll learn:
- What germination is
- 5 methods how to germinate your seeds
- How long the process takes
- Common mistakes
- Lots more
In short: if you want to learn successfully germinate your precious marijuana seeds, you’ll love this new guide.

Don't Learn it the Hardway
A long time ago, as first-time growers, we had no idea what we were doing.
It was overwhelming and tempting to skip over this first phase; we were excited for the result, after all.
We had to learn the hard way, but a high-quality cannabis seed is only as good as the growing circumstances and the environment you provide.
If you want to grow marijuana, The germination process of the seeds is where it all begins.
It turns out that germinating weed seeds isn’t all that difficult.
With a little know-how and preparations, you’ll be well on your way to being a successful parent to a little seedling.


Shortcut to 99,9% Succes Rate
We get it.
You are here for a quick answer.
Want to know what Germination Method our Seed Breeders use?
Spongepot's Seed Germination Kit
Always.
Ps. Read the rest of this guide later: we share our growth hack!
What Is Germination, anyway?
Once you’ve planted a weed seed, it goes through a period of dormancy before you can successfully germinate cannabis seeds. When the seed splits or shows a root, this indicates successful germination. This occurs under specific conditions that involve:
- Light
- Water
- Oxygen
- Temperature control
How successful the germination process is depends on the conditions mentioned above. For example, if there’s not enough water, the seed won’t germinate.
Conversely, too much water can virtually drown the seed by restricting its access to oxygen.
When the needs of the seed (see what we did there?) are met, the first thing it does is take in oxygen and water. Its coating will break, or pop, open and a root will emerge.
A single plant shoot then appears to finalize the process.
Such a simple process! Once you have the basics down, you’re ready to tackle that first seed.
Germinating Cannabis Seeds
From seed to harvest, a marijuana species go through a specific set of steps that ensure a fruitful result. From seed to harvest, a marijuana species goes through a specific set of steps that ensure a fruitful result, starting with the care of cannabis seedlings.
In brief, they are:
Indoor
- Choosing your seed
- Germination: 3-7 days
- Vegetative: 1-2 weeks
- Flowering: 8-11 weeks
- Harvesting/drying: 1-3 weeks
Outdoor
- Choosing your seed
- Germination: 3-7 days
- Seedling: 2-3 weeks
- Vegetative: 3-16 weeks
- Flowering: 8-11 weeks.
- Harvesting/drying: 1-3 weeks
On average, the entire process takes around 3–5 months, sometimes longer, depending on the species and if you’re growing indoors or out. The latter tends to take more time, given the conditions are much less controllable.
Germinate Cannabis Seeds: Get the Basics Right
Nailing the basics sets you up for a good grow and successful germination from the get-go. One of our primary concerns here is the quality of seed.
What makes a premium weed seed?
- Color: The best weed seeds will be light to dark brown. Green seeds indicate they were harvested early and/or contain no embryo inside — useless!
- Texture: Look for seeds that are hard to the touch. Soft, squishy ones indicate they’re not ready for planting.
- Storage: Any seeds you purchase should be kept at a temperature of around 71-77 ℉ /21-25 ℃
Additionally, using feminized seeds can ensure that you only grow female plants, which are essential for producing the resinous buds.
In regards to other conditions, lighting won’t be such an issue just yet, as germinated seeds won’t require it until the root has popped and the first plant shoot has appeared.
You may be wondering if size plays a role as well?
As tempting as it may be to assume the seed’s size is equivalent to how large the plant will be, don’t do it.
For example, a small Sativa seed might turn into a monstrous species once grown.
Germination Methods
Now let’s get dirty! There are five options to choose from today, depending on what you have at hand or are willing to get to germinate your seeds:
- Glass of water
- Wet towel
- Directly in soil
- Stone wool blocks
- Using the Spongepot starter kit.
For any of these options, you will need some growing medium to get them to germinate successfully.
Method 1: Glass of Water

Also referred to as “pre-germination,” this method involves soaking the seeds in water. It’s used particularly for older seeds to try and “wake” them up.
- Soak the seeds: Soak your seeds in lukewarm, chlorine-free water overnight.
- Float or sink: Seeds that initially float show better chances of surviving.
- Check for germination: You’ll see that a white root has “popped” or germinated. This should happen within 1 to 3 days.
- Retrieve your seeds: Gently remove the seed and dry it on a kitchen towel.
Pros
- May be able to revive old seeds
Cons
- Risky
- Should only be attempted with seeds that might die otherwise.
- despite 1 to 3 days being the norm on average, in practice, this can sometimes take up to 7 days.
Method 2: Paper Towel Method
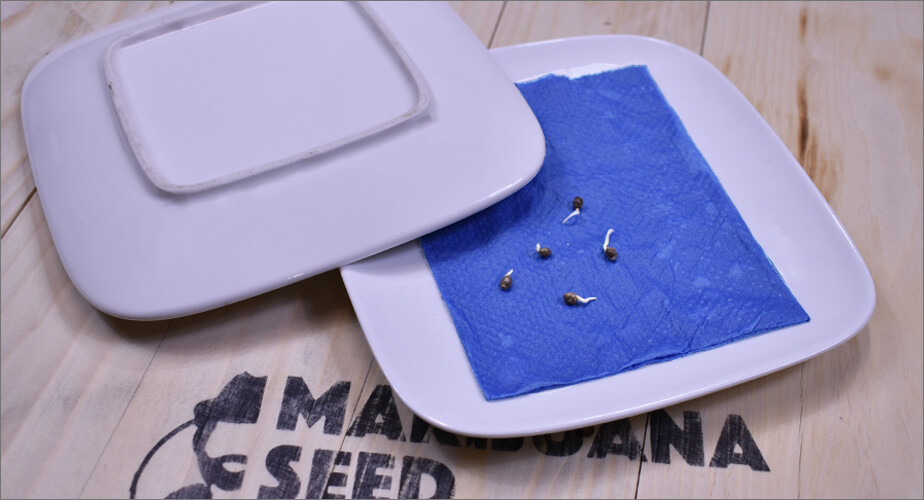
Similar to the method above, using a wet towel is another pre-germination method.
- Wet a paper towel: Do so until it’s completely covered but not dripping. Use cheap, non-porous paper towels for best results
- Fold your seeds inside: Tuck your seeds into the paper towel securely
- Plate it: Place the towel on a paper plate with another plate on top
- Leave in a warm place: Leave for at least a day and up to a week, checking periodically for any popping
Pros
- Old seeds might have a chance here
Cons
- Seeds may suffer from a lack of oxygen
- Mold and mildew might show up
- Seeds can become too nimble for a successful transplant
Method 3: Directly in Soil
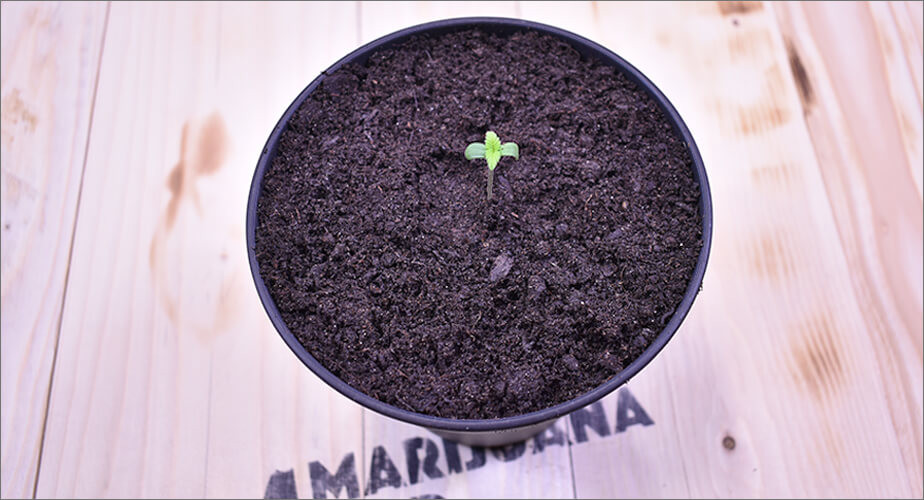
This sounds like a more natural method to use... because it is! No fooling around with pre-germination tricks, here:
- Use an 8-10 cm/ 3-4 inch pot: Take your pot and fill with seed and cutting soil. Press down.
- Make a hole: Use a narrow, pointy object to make a 3-5mm/ 0.20 inch hole in the middle.
- Put the seed inside: Place it gently in the hole.
- Use chlorine-free water: The soil should be moist but not overly saturated.
- Place in a proper location: Find a warm enough area for the seeds to rest.
- Find balanced temperature: Too cold and the seeds won’t budge, but too hot and they might dry out. If you’re in a cooler climate, use lighting for warmth. As recommended earlier, 71–77 ℉ /21-25 ℃ is ideal.
- Wait three days: It will take, on average, between 3 and 7 days for germination.
Pros
- Mimics a natural setting.
- Requires little equipment.
Cons
- Takes a bit of a green thumb.
Method 4: Stone Wool Blocks
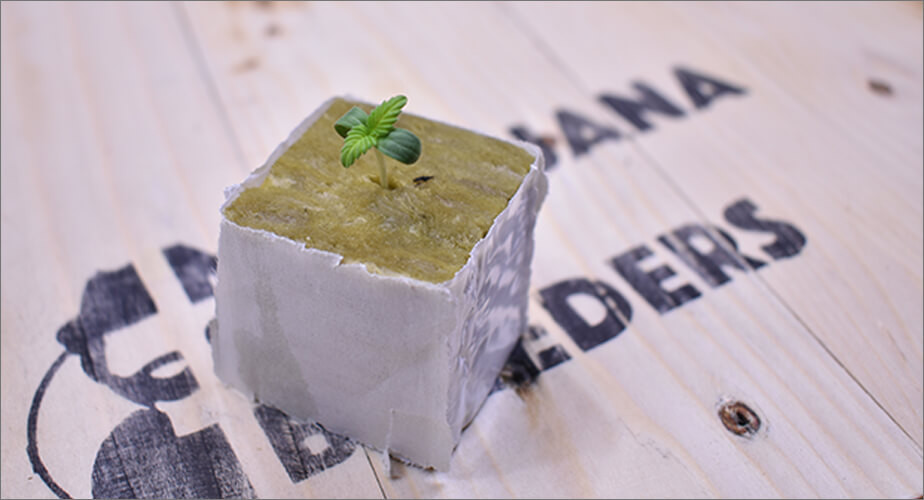
These are the little blocks you’ve probably seen at your local garden shop; nicely organized and packaged for root cuttings and germinating seeds. They’re also perfectly suitable for weed seeds!
- Immerse the cubes: Cover them with water with a pH of 5.6–5.8.
- Gently squeeze: Do this to wring out any excess water.
- Place the seeds: Plant the seeds horizontally within the pre-formed hole.
- Cover the hole: Use an extra piece of the soft wool to do this. Make sure it’s not packed too tightly, in order for oxygen to reach the seed.
- Choose a warm location: Use the temperature range listed under the soil method above.
- Water the cubes: With the same pH as stated in step one, water every 1 to 2 days.
- Wait three days: It should take around 3 to 5 for germination to occur.
Pros
- Similar to a natural process.
- Easy-to-find supplies.
Cons
- Cubes may harbor moisture, leading to dead seeds.
Method 5: Using a Starter Kit
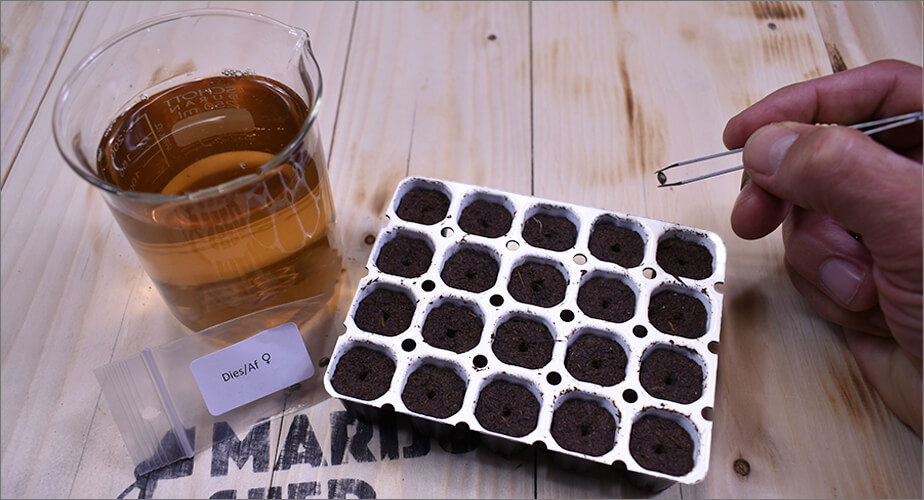
A starter kit is a convenient method that gives you everything you need for successful germination. With the Spongepot, you’ll receive a package of 20, 48 or 96 pots to get you started.
The instructions are, more or less, foolproof:
- Put supplied bacteria in water: Dissolve the bacteria in a liter of water.
- Water the Spongepots: Use the bacteria-water to water the provided Spongepots.
- Drain: Drain away any excess water that accumulates in the process.
- Plant seeds: Plant one seed per pot, about 3-5 mm/ 0.20 inch deep.
- Maintain temperature: Place the Spongepots in a place between 71 and 77 ℉ / 21-25 ℃
- Time to wait: Seeds should germinate between 3 and 7 days later.
- Transplant the seeds: Once the seeds finish, you can transplant them to their pot to begin their seedling phase.
Pros
- Easy to use.
- Includes a soil enhancer.
- Organic soil mixture with useful fungi.
- Promotes healthy roots.
Cons
- Only available through online order.
We at Marijuana Seed Breeders not only care about your seeds but the success of their germination. This gemination method is our favorite! It gives us the highest success rate.
You can see how to germinate with Spongepot in the video below or on the Spongepot product page.
How Long Does the Germination Process Take?
From start to finish, the germination process can take anywhere between 1 and 7 days.
Note that this is an average and the actual time frame depends on the individual seed quality and the growing conditions we discussed earlier.
For example, is the seed large or older? Maybe the temperature is a bit cooler? Seeds with these conditions may take up to more than a week to pop.
Seeds in the ideal temperature range should germinate within a week, maximum.

When Can I Pot My Seedlings?
We understand your predicament. You want to take the best care possible but, at the same time, you don’t want to become impatient and risk the entire process.
The good news is that it doesn’t take long! Once the seeds have popped and you see that root coming through, it’s time for planting germinated seeds.
This, of course, will depend on the method you’ve used, but also the state of the seed from the beginning.
Generally speaking, you’ll be ready to do this anywhere between 3 and 10 days after the start of the germination process.
Once your newly-germinated seeds are ready to go in their special medium, you will continue looking over the seedling phase from there.
Depending on the size of your plant, you may need to switch to a larger pot at some point during the process. If this isn’t done, you could experience something called “root bound,” which means the rooting system has grown beyond the pot.
How to tell? Here are some signs:
- The new growth is fragile and weak-looking
- There’s discoloration on the stem
- May appear to be underwatered
Another distinguishing trait to look out for that may indicate your plant is ready for a new pot includes how many leaves your plant has. On average, when plants have around four to five sets of leaves, it’s time for a transplant.
Common Germination Mistakes
When it comes to growing cannabis, there’s a slew of common mistakes that could stop you from achieving a successful grow. More specific to germination, pay attention to:
- Leaving seeds for too long
- Incorrect planting methods
Avoiding these common mistakes will help you successfully germinate cannabis.
Leaving Seeds for Too Long
Overestimating your seed’s germination needs could leave you with duds in the end. This is usually the case with pre-germination methods mentioned above, such as the cup or paper towel method.
Leaving your seeds for too long could result in overly sensitive roots that are easily damaged in the transplant process.
Avoid this mistake by transplanting your seeds when the root is approximately one to two centimeters in length.
This ensures the roots are stable but not overly saturated and prone to damage.
Incorrect Planting Methods
We see mistakes being made when it comes to the “two D’s” of direction and depth.
Direction
Placing the seed in its planting medium may seem like an overly simple task. However, there’s still a chance you could screw it up.
Avoid planting it in the wrong direction by paying attention to the seed’s crown.
This looks like a small crater shape located at one end of the seed. The other end has a point, so they’re easy to distinguish from one another.
Make sure that the seed’s crown is facing you when you plant it, which leaves the pointy end facing downward.
This way, when the seed germinates, it’ll sprout properly, sending the root down versus the opposite scenario of resulting in a failed seedling.
Depth
The planting depth matters, too. This will differ depending on the type of seed you’re planting and the medium it’s going in.
Generally speaking, we want to avoid planting seeds too deep, which could result in a seedling never showing up.
The opposite of this, planting too shallow, may also pose a problem. Doing so could result in weak plant stems that may not allow the seedling to grow.
Avoid either scenario by aiming for about 3-5 mm/ 0.1- 0.2inch in depth when you plant.
Germinate Away
As you can see, germinating cannabis seeds is a basic procedure that if done with a little care and forethought, should be a successful one.
Have a designated location ready that’s warm but not too hot. If you live in a cool climate, use lights for warmth, and make sure your germinating seeds stay wet but not saturated.
It might be tempting to use a pre-germination method, such as the cup or paper towel, but we recommend avoiding these as much as possible.
Using a starter kit, instead, will enable you to have high-quality resources at your fingertips that cover you from A to Z.
Pay attention to any root growth or “popping” to indicate germination is complete.
By following our guidelines, you’ll be transplanting your baby plants in no time.
Jennifer
I have a passion for nutrition, organic supplements, and (mental) health. After learning about the beneficial properties of marijuana, I dedicated myself to writing articles that will teach you everything there is to learn about this miraculous plant. I'm looking forward to sharing with people how they can incorporate the benefits of marijuana into their healthy lifestyle: you don't have to smoke to consume marijuana.
Our Growth Hack to Bigger Buds
You have learned that we prefer to work with a germination kit.
There is more.
Right from the start, we add
Result? Stronger Roots, Bigger buds.
Learn more about the Healthy roots kit. You'll thank us later.
Happy growing :)